
Do you have a lamp post that needs to be installed? Before you get started, there are a few things you need to consider. In addition, it’s important to make sure the area for installation is cleared of any debris and objects that could cause injury. When deciding on the height of your lamp post, keep in mind that the higher up it is, the less likely it will obstruct sightlines or views in your yard. Lastly, don’t forget to check with local authorities before Install a Lamp Post Outdoor!
1. Consider the location
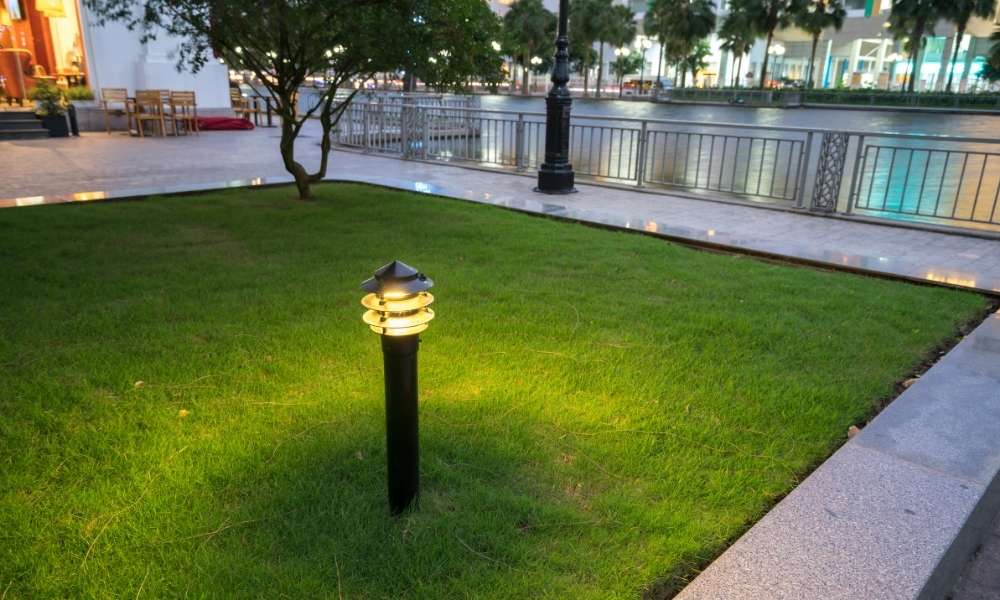
You want to make sure that the area is clear and free of clutter or objects that could cause injury. It’s also Outdoor important to consider how high up the post will be. Choose a height that won’t obstruct sightlines or views in your yard – a higher level will be less likely to interfere with these things.
2. Estimate the Height of your Lamp Post
It’s essential to estimate the height of your Outdoor lamp post before installing it. The higher up it is, the less likely it will obstruct sightlines or views in your yard. If you’re not sure what height would be best for you, there are a few guidelines you can use:
- A lamp post should be at least 10 feet high if it is outside on a lawn and 15 feet high if it is on a concrete patio.
- For a lamp post that is going to be mounted onto a brick wall, make sure the top of the pole is no more than 2 inches below the bottom of the first course of bricks.
- It’s best to measure from the ground rather than from eye level because most people stand at an average height of 5’6″ while they’re measuring.
See More: How To Hang Outdoor Lights On Stucco
3. Things to Consider Before Installing a Lamp Post
The location of your lamp post will be important to take into consideration before installation. You want your new outdoor lamp post to not obstruct sightlines or views in your yard. Lastly, you’ll need to make sure you’ve checked with local authorities before installation!
4. Clear the Area for Installation
Before you can install your new Outdoor lamp, you need to clear the area for installation. First, make sure that the area is free of any debris or objects that could cause injury. Second, make sure that it is not shaded by the sun or wind.
5. Check with Local Authorities
It’s important to check with local authorities to make sure that you’ll be in compliance. This can save you a lot of time and frustration later on when trying to install the post.
if you live in the United States, there may be different regulations for the height of your lamp post. It’s also important to note that some areas will require permits for the installation and use of such products. Once you’ve checked with all the necessary authorities, you’re ready to start installing your new outdoor lamp post!
If you’re not sure where to start, this guide is for you. Check out these steps for the successful installation of your new outdoor lamp top:
- Clear any debris from the area where you intend to install your lamp post
- If possible, use a level to mark off an area that is at least 6×6 ft. This will help ensure the base of your lamp will be stable
- Dig a hole 18 inches deep by 12 inches wide
- Place a metal footing into the hole
- Pour gravel into the bottom of the hole until it reaches the rim
- Fill the rest of the hole with soil and tamp it down firmly
- Screw in the top cap securely so the base is equal with the ground (to avoid water seepage), and then place the pole into the hole
6. Debris and Objects in Area
When deciding on the height of your Outdoor lamp post, keep in mind that the higher up it is, the less likely it will obstruct sightlines or views in your yard. It’s important to ensure the installation area is cleared of any debris and objects that could cause injury.
7. Height of Electric Cord

When Install a Lamp Post Outdoor, make sure to leave enough room between. This gives you enough room for the electric cord to hang while still keeping it safe from any debris or object that could cause injury.
When deciding on the height of your lamp post, keep in mind that the higher up it is, the less likely it will obstruct sightlines or views in your yard. Lastly, don’t forget to check with local authorities before installing your new outdoor lamp post!
8. Step-by-step Instructions for Installation
The following installation instructions are for a 4-foot tall Outdoor lamp post. If you would like to install a taller or shorter lamp post, make the appropriate adjustments.
Lastly, place the cap on top of all of the posts by threading a nut onto each one and tightening them with a wrench. When installing lights onto your new lamp post, remember not to exceed 75 watts per Outdoor light as this could lead to electrical fire hazards or lead-acid battery failure!
9. Maintenance
Now that you have your post installed, it’s time to start thinking about maintenance. If you outdoors live in a cold climate, it’s important to make sure the lamp post is insulated from the elements (such as ice and snow) with a bucket of sand or insulation, or by wrapping the pot in plastic. In warmer climates, make sure your post is shaded so it doesn’t get too hot. Lastly, don’t forget to clean your lamp post periodically to avoid rusting and discoloration.
Conclusion
Install a Lamp Post Outdoor might also look like a daunting project, however it can be accomplished conveniently with the right understanding. Follow these easy steps and you will have a stunning and strong lamp publish to enjoy for years yet to come.